Contacts and call history in the Webphone
Find, add and edit contacts, set a caller ID per contact, search your call history, play call recordings and block numbers in the Webphone.
The Contacts tab shows the phonebooks your administrator shares with you, and History lists your calls. This page covers what you can do in each, in the browser and desktop Webphone.
Contacts
Section titled “Contacts”Find a contact
Section titled “Find a contact”- Open Contacts.
- Choose a phonebook from the list above the contacts: All phonebooks, a phonebook your administrator shares with you, or your own Personal phonebook.
- Type a name or number in Search.
Wherever a contact appears in the Webphone, such as on a call or in history, the phonebook it belongs to is shown with it. To choose which phonebook Contacts opens on, go to Settings › Defaults › Default phonebook.
The phonebooks you see are set by your administrator in your User settings. See Phonebooks.
Add or edit a contact
Section titled “Add or edit a contact”- Click New contact, or the pencil icon next to a contact to edit it.
- Enter the Phone number, choose the Phonebook and enter the Name. Email is optional. Click Upload new avatar to add a picture.
- Optionally, choose Which caller ID to use when calling this contact. This caller ID is used only when you call the contact from a phonebook. Leave it as Selected on the dialpad to use your usual caller ID.
- Click Create (or Update when editing).
To delete a contact, click the bin icon next to it and confirm with Delete.
You can’t add, change or delete contacts in a read-only phonebook. Only a PBX administrator can.
Contact actions
Section titled “Contact actions”Click a contact’s number to call it. Hover over a contact to see more:
- the copy icons next to the name and number;
- send an SMS (not available for internal numbers);
- send an email, if the contact has an email address;
- Integrations: see the contact in your CRM, if your account has a CRM integration. See Integrations overview;
- edit (pencil) and delete (bin), in phonebooks you can change.
Colleagues in your contacts also show their status, and you can answer their incoming calls. See Answer a colleague’s call in the Webphone.
Call history
Section titled “Call history”Find a call
Section titled “Find a call”History lists your calls with their Type, Line used, Duration and Time.
- Search: type a name or number.
- Refresh: click the round arrow next to the page numbers to load new calls.
- Filters: choose a Date range, the Type of calls (All, Incoming, Outgoing or Missed), or turn on Show internal calls only. Click Apply. Reset clears the filters.
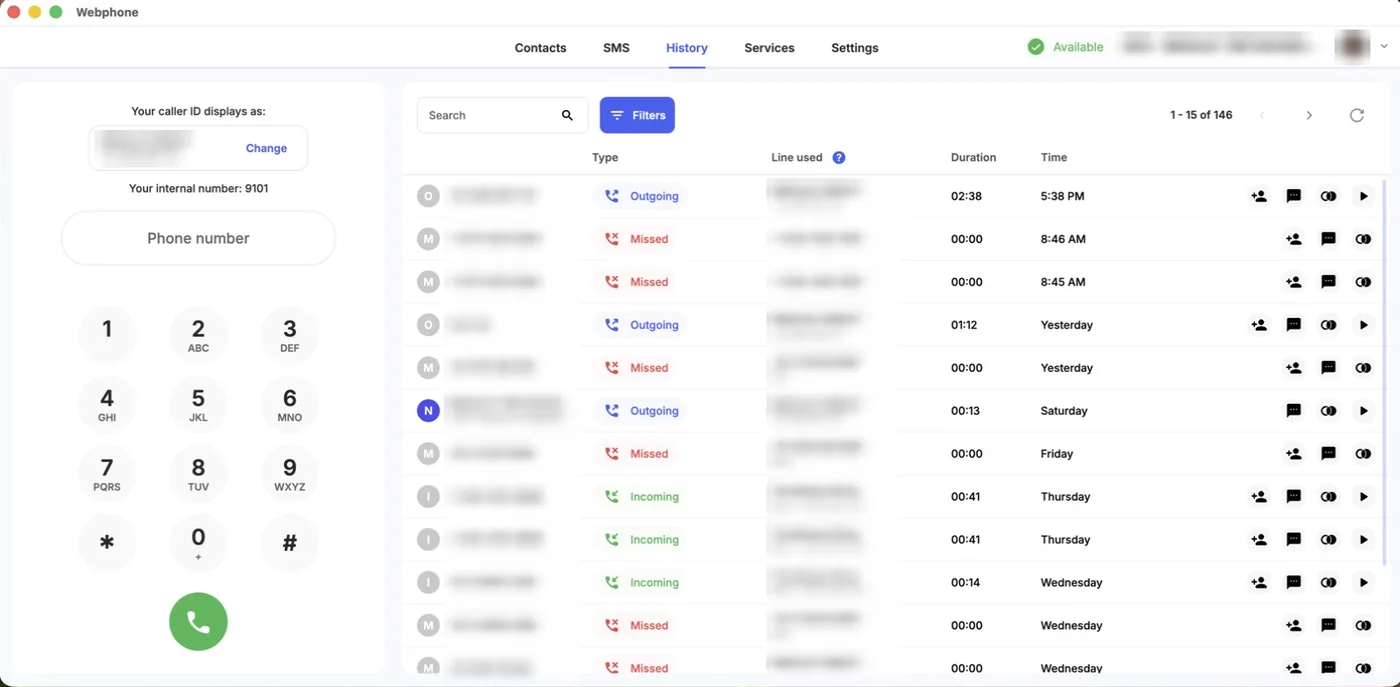
Line used is the number the call came in on, or the caller ID you used for an outgoing call. When you call back from history, the Webphone uses this number as your caller ID if it can, unless you’ve chosen Confirm for each call.
To call back, click the call’s type (for example Missed). The icons at the end of the row add the number to your contacts, send an SMS or email, open the contact in your CRM (Integrations), or play the call recording.
Play a call recording and read its transcript
Section titled “Play a call recording and read its transcript”If your administrator saves your recordings in cloud storage, calls with a recording have a play icon at the end of the row. Click it to open Call recording. The recording starts playing straight away.
- The player: a waveform of the call, with play and pause, the time played and the length of the recording. Click anywhere on the waveform to jump there, and press the Space bar to play or pause. Click the download icon to save the recording.
- More than one recording: if the call was recorded in parts, each part has a tab, for example Recording #1 (02:40).
- The transcript: with Speech-to-text, the transcript appears under the player, split into turns. Each turn shows the speaker (1, 2 and so on, each in its own colour) and its start and end times.
- While the recording plays, the current turn is highlighted, the word being spoken is marked, and the transcript scrolls along with it.
- Click a turn to play the recording from that point.
- Scrolling the transcript yourself pauses playback, so you can read back. Press play to carry on.
- No transcript yet: click Transcribe recording. Transcription in progress… shows until it’s ready. Transcription is charged under your speech-to-text plan; if your balance is too low, you’re asked to top up first. The button doesn’t appear if speech-to-text isn’t on for your account.
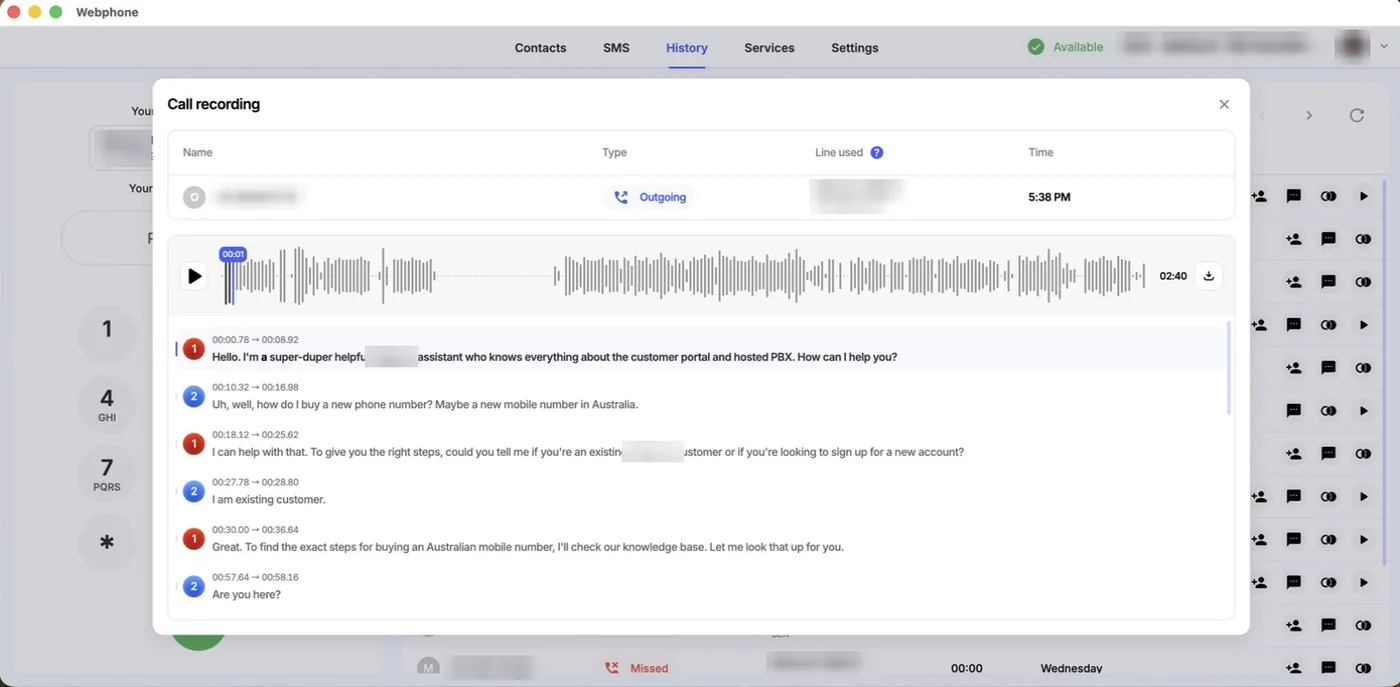
Transcripts can contain mistakes, including the wrong speaker, so check important details against the recording. The transcript ends with a reminder of this.
Recordings need call recording storage and recording turned on for your user. Administrators can also find them in Call recordings.
Block a number
Section titled “Block a number”You can block an outside number from History, SMS or Voicemail:
- Hover over the call or message and click the block icon.
- Optionally, enter a Reason for blocking.
- Click Block.
Calls and SMS from the number are then rejected for your whole PBX. The number is added to your Global blocklist. To unblock it, click the red block icon and confirm with Unblock.
Internal numbers can’t be blocked. If you don’t see the block icon for an outside number, your administrator hasn’t allowed you to block numbers.