Bria Solo
Connect the Bria Solo softphone on a computer or mobile to a SIP device on your PBX.
Bria Solo is a paid third-party softphone for desktop and mobile. You set up the connection once in your online Bria Solo account, then sign in to the Bria app on each computer or phone. Bria’s subscription isn’t part of your PBX service.
Before you start
Section titled “Before you start”- Add a SIP device to the person’s User under Device configuration, and click Apply configuration.
- Open Devices at the top of the PBX tab and select the device. Keep its SIP credentials open: Domain, Username and Password.
- Sign up for Bria Solo (a free trial is available) and sign in to your Bria Solo account online.
The Domain shows the server address, a colon and the port.
If Transport protocol shows TLS, TLS encryption is on for your PBX. The port in the Domain is then different, and you must set the Bria voice configuration to use TLS instead of TCP, with SRTP (shown as Media encryption).
1. Add the voice configuration
Section titled “1. Add the voice configuration”-
In your Bria Solo account, go to Voice and Video and click Add Voice Configuration.
-
Choose Have your own PBX or SIP Server?
-
On the General tab, fill in:
Bria field What to enter Domain The part of the Domain before the colon. Port The number after the colon. SIP Username/Call Extension The Username. Authorization Username The Username. SIP/Voice Password The Password. 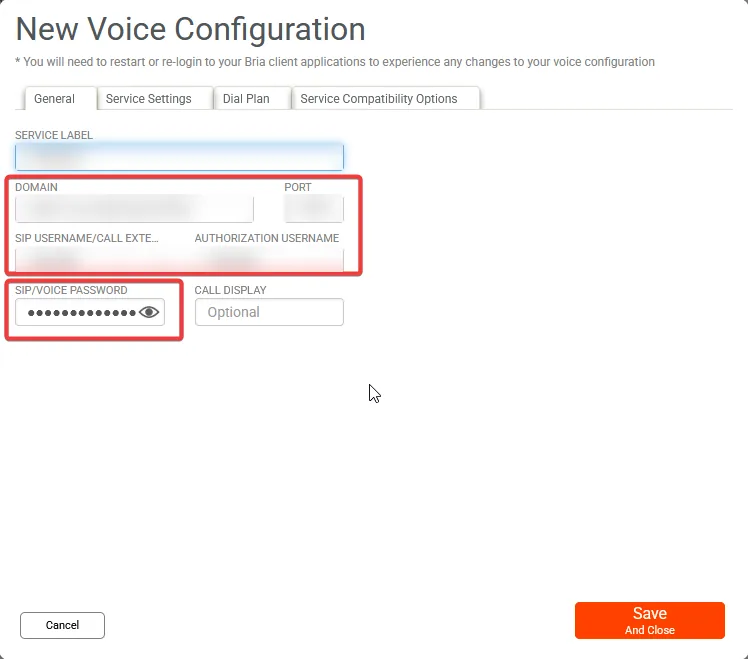
-
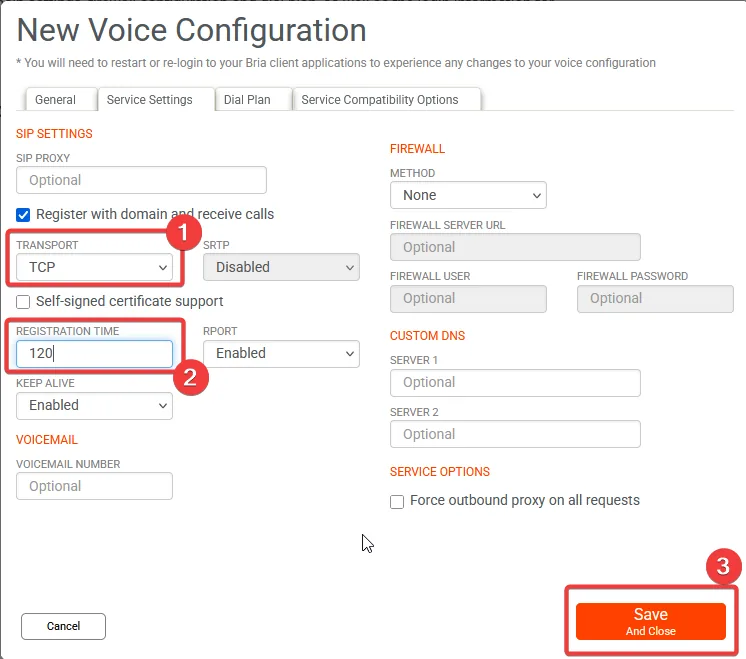
On the Service Settings tab, set Transport to TCP and Registration Time to 120.
-
Click Save And Close.
2. Install Bria on your computer
Section titled “2. Install Bria on your computer”- In your Bria Solo account, click Download Client Apps and download the version for your computer.
- Install it and sign in with your Bria Solo email and password. The voice configuration loads automatically.
3. Install Bria on your iPhone or Android phone
Section titled “3. Install Bria on your iPhone or Android phone”- In the App Store or Google Play, install Bria - VoIP Softphone.
- Open it and sign in with your Bria Solo email and password.
- Tap the three lines at the top, then Settings › Account.
- Under Push Service, change Registration Mode from Single Device Takeover to Single Device Emulation.
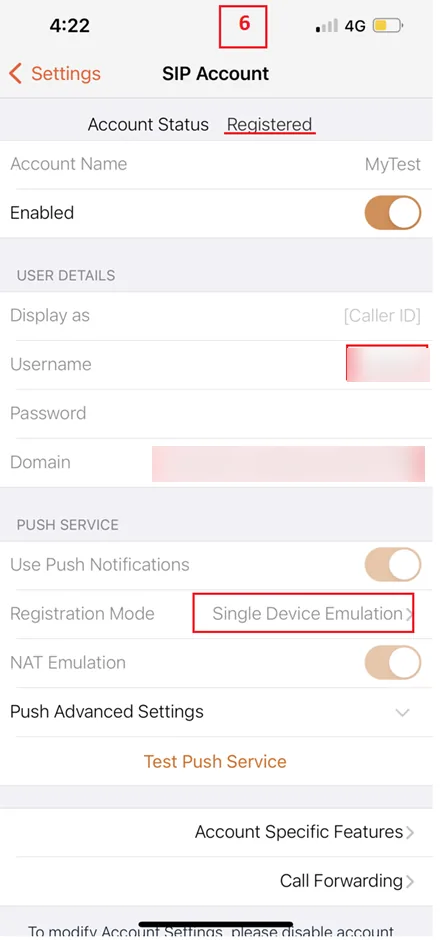
If Registration Mode is greyed out, turn off Enabled for the account, make the change, then turn Enabled back on.
Without this change, Bria on your phone and computer can fight over the connection and calls may fail with a 403 Forbidden error.
Check it works
Section titled “Check it works”- In PBX › Devices, the SIP device shows Online.
- Make and receive a test call on each device.
If it stays offline, see Softphone errors. A device that tries to register with a wrong password is blocked, and the block lifts after 5 minutes.