Set up a Yealink desk phone manually
Enter the SIP details in the phone's web interface when auto-provisioning isn't an option.
Use this guide to connect a Yealink desk phone by typing its SIP details into the phone’s web interface. If your model supports it, auto-provisioning is quicker. To enter the details on the phone’s own screen instead, see Set up a Yealink phone from the handset.
Before you start
Section titled “Before you start”- A SIP device in PBX › Devices, added to a User, with the configuration applied. See Devices.
- A computer on the same network as the phone.
1. Connect the phone and find its IP address
Section titled “1. Connect the phone and find its IP address”- Connect the handset, stand and power supply, then plug the phone’s Internet port into your network.
- When the phone has started, press OK once, or open Status › General on the phone. Note the IPv4 address.
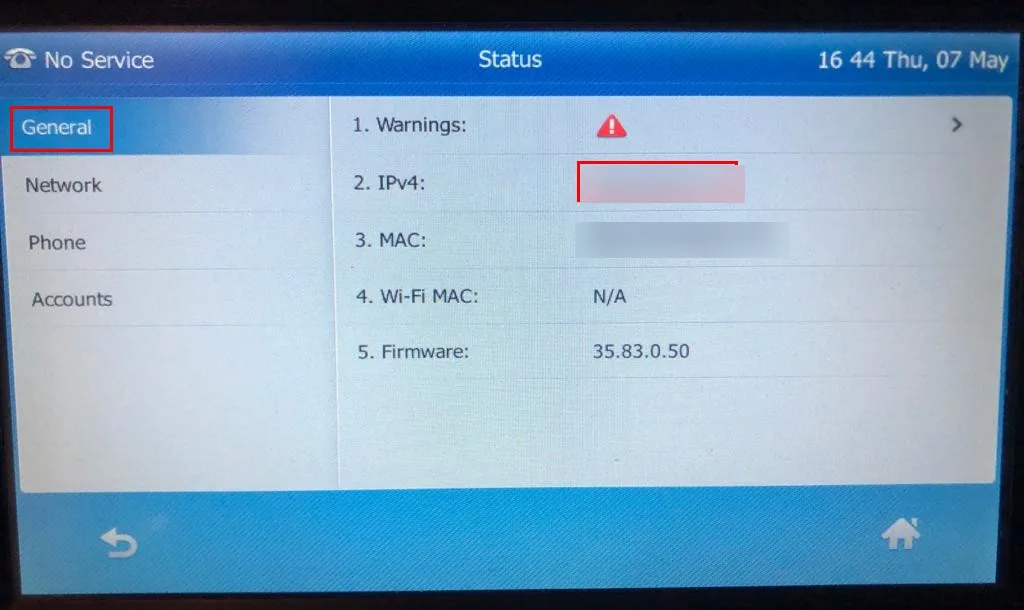
If IPv4 is blank, the phone didn’t get an address from your network. Check the cable, or ask whoever manages your network.
2. Sign in to the phone’s web interface
Section titled “2. Sign in to the phone’s web interface”- On the computer, type the IP address into a web browser’s address bar.
- Sign in. The default username and password are both
admin.
Change the default password once you’re in, so nobody else on your network can change the phone’s settings.
3. Copy the SIP details from the PBX
Section titled “3. Copy the SIP details from the PBX”In PBX › Devices, select the SIP device. Under SIP credentials, copy:
| In the PBX | Goes into the phone’s |
|---|---|
Domain, shown as server:port |
Server Host (the part before the colon) and Port (the part after it) |
| Username | Register Name and User Name |
| Password | Password |
| Transport protocol (TCP, or TLS if TLS encryption is on) | Transport |
4. Enter the details in the phone
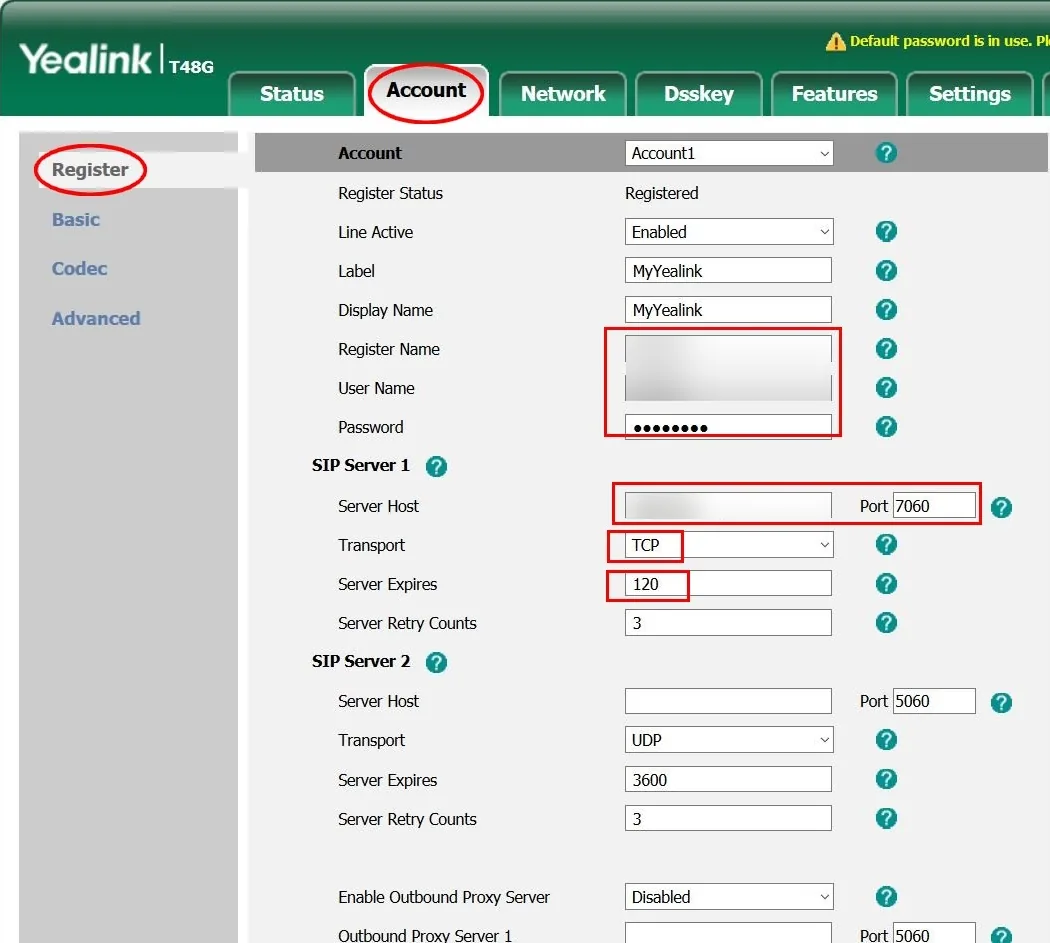
Section titled “4. Enter the details in the phone”- Go to Account › Register. Check that Account shows the account you want, such as Account1.
- Set Line Active to Enabled.
- Enter a Label and Display Name. The label is shown on the phone’s screen.
- Enter the Register Name, User Name and Password.
- Under SIP Server 1, enter the Server Host and Port.
- Set Transport to TCP and Server Expires to 120. If TLS encryption is on, follow TLS and SRTP encryption instead.
- Click Confirm.
Check it works
Section titled “Check it works”- Register Status on the phone changes to Registered.
- In PBX › Devices, the device shows Online.
- Call another user’s internal number.
If the device stays Offline:
- Check every field again, and check the configuration was applied.
- Wait a few minutes. A device that tries to sign in with wrong details is blocked, and the block lifts after 5 minutes.
- If you generated a new password, it can take up to 5 minutes after applying the configuration before the device can connect.
- See Device offline.
Turn off the missed call light (optional)
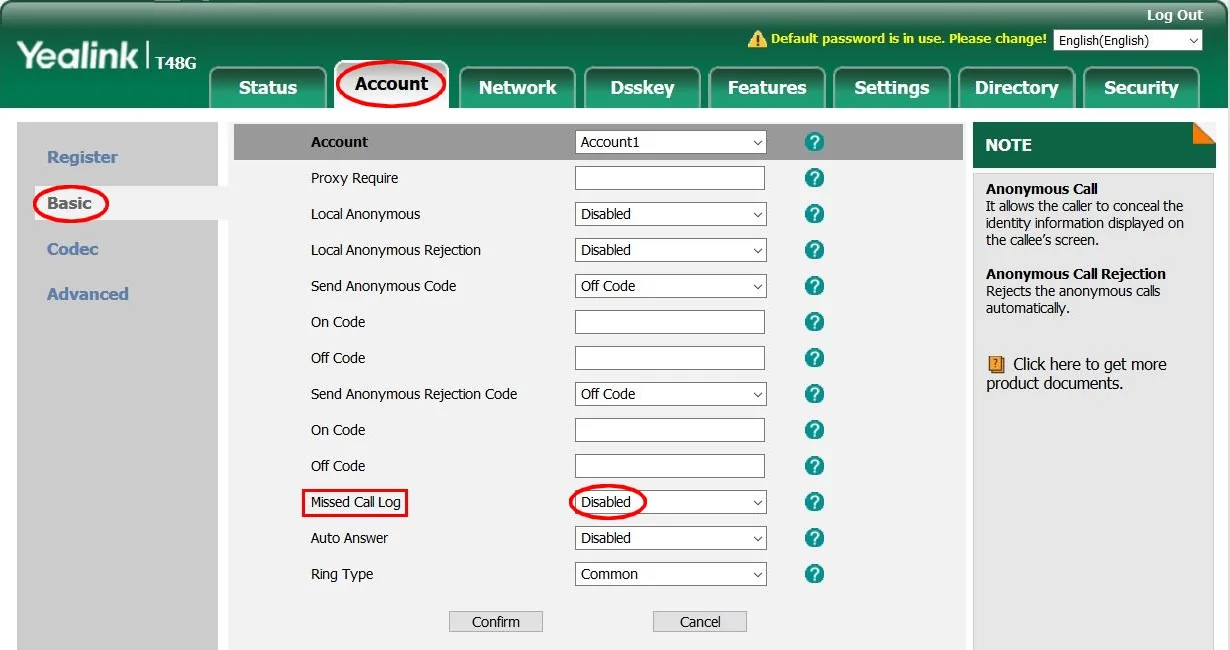
Section titled “Turn off the missed call light (optional)”By default the phone flashes a red light and shows a message after a missed call. To turn this off:
- In the web interface, go to Account › Basic.
- Set Missed Call Log to Disabled and click Confirm.
Update the firmware
Section titled “Update the firmware”Keep the phone on the latest firmware from Yealink. Older firmware can stop auto-provisioning or secure connections from working.
- Download the latest firmware for your exact model from Yealink’s support site. It’s a
.romfile. - In the web interface, go to Settings › Upgrade.
- Under Upgrade Firmware, click Browse, choose the
.romfile and click Upload. - Wait until the phone confirms the upgrade has finished. Don’t refresh the page or unplug the phone in the meantime, or the phone may not start again.