Connect Retell AI with SIP trunks
Send calls to a Retell AI voice agent and let it make outbound calls on your numbers.
This guide connects a Retell AI voice agent to your PBX, so it can answer calls to your number and make outbound calls with your caller ID. Retell AI needs two SIP trunks in the PBX: one for inbound calls and one for outbound calls.
For help with Retell AI itself, such as building agents, contact Retell AI.
Before you start
Section titled “Before you start”- Order two trunk licences and enough channels: go to Services › SIP trunking, set the number of Channels (one per simultaneous call), click Add licence twice, tick Agree to service terms and conditions and click Submit order.
- Have a Retell AI account with at least one agent.
1. Create the inbound trunk in the PBX
Section titled “1. Create the inbound trunk in the PBX”This trunk sends incoming calls to Retell AI.
- Go to the PBX tab. Drag SIP trunk from the Accept, make and divert calls group onto the canvas and click the gear icon.
- Enter a Name, such as “Retell inbound”, and set the Number of channels.
- For Mode, choose IP authentication.
- In SIP URI address, enter your phone number followed by Retell AI’s SIP server, for example
61XXXXXXXXX@sip.retellai.com:5060. Use the number in international format without spaces. Check Retell AI’s own SIP trunking help for its current server address. - Click Save.
- Connect the Inbound number for that phone number to the SIP trunk. You can also connect it from a voice menu or time condition, so only some calls go to the agent.
2. Create the outbound trunk in the PBX
Section titled “2. Create the outbound trunk in the PBX”This trunk lets Retell AI sign in to the PBX and make calls.
- Drag another SIP trunk onto the canvas and click the gear icon.
- Enter a Name, such as “Retell outbound”, and set the Number of channels.
- For Mode, choose SIP registration.
- Choose a SIP trunk call plan. Without one, outgoing calls won’t work.
- Choose the Caller ID for outgoing calls.
- Click Save, then click Apply configuration.
Open the outbound trunk’s settings again and note the SIP credentials: Domain, Username and Password. Also note the Transport protocol: TCP, or TLS if TLS encryption is turned on in Settings › General.
3. Add your number in Retell AI
Section titled “3. Add your number in Retell AI”-
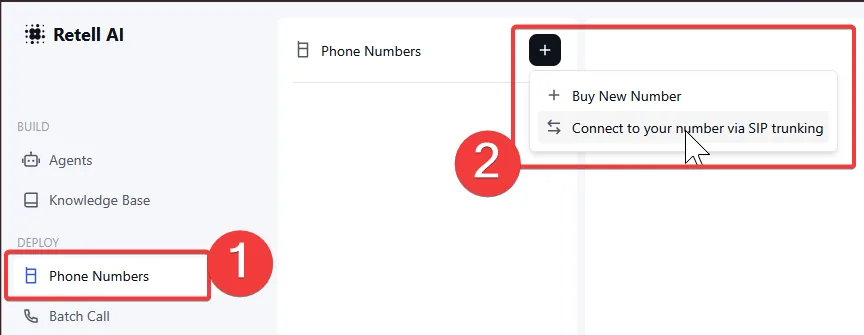
In Retell AI, click Phone Numbers, then click + and choose Connect to your number via SIP trunking.
-
Fill in the form:
Retell AI field Enter Phone Number Your phone number, the same one as in the inbound trunk’s SIP URI. Termination URI The outbound trunk’s Domain, including the port. SIP Trunk User Name The outbound trunk’s Username. SIP Trunk Password The outbound trunk’s Password. Nickname Optional. -
Click Save.
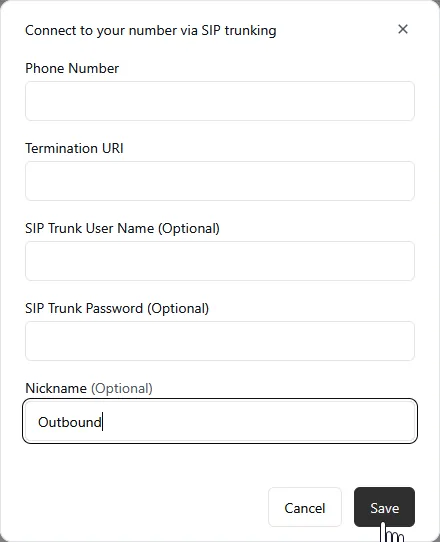
You can also add the number twice: once without a username and password for inbound calls, and once with them for outbound calls.
4. Assign your agents
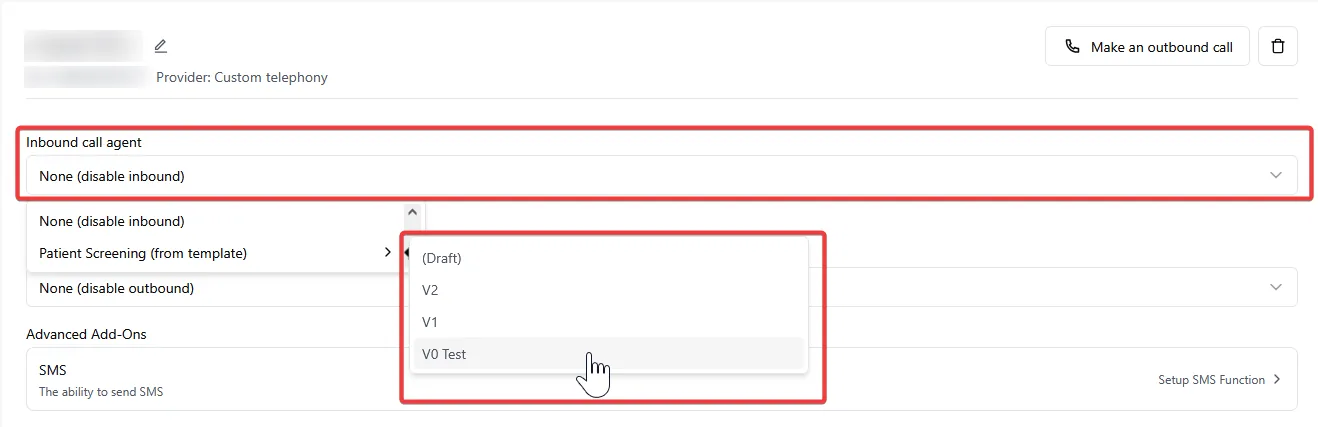
Section titled “4. Assign your agents”- Click the number in Phone Numbers.
- Choose your agent under Inbound call agent for calls the PBX sends to Retell AI.
- Choose your agent under Outbound call agent for calls the agent makes.
Check it works
Section titled “Check it works”- Call your number from a mobile. The Retell AI agent should answer.
- Start an outbound call from Retell AI to a mobile. The mobile should show the caller ID you chose.
The outbound trunk can show Offline in the PBX. That’s expected with Retell AI: outbound calls still work.
Next steps
Section titled “Next steps”- SIP trunk for every setting, including the No answer and Failed paths if the agent doesn’t pick up.
- Route only after-hours calls to the agent with Time conditions.