MicroSIP
Connect the free MicroSIP softphone for Windows to a SIP device on your PBX.
MicroSIP is a free, open-source softphone for Windows. You connect it to a SIP device on your PBX and use it with a headset.
Before you start
Section titled “Before you start”- Add a SIP device to the person’s User under Device configuration, and click Apply configuration.
- Open Devices at the top of the PBX tab and select the device. Keep its SIP credentials open: Domain, Username and Password.
The Domain shows the server address, a colon and the port.
If Transport protocol shows TLS, TLS encryption is on for your PBX. The port in the Domain is then different, and you must set the app to use TLS instead of TCP, with SRTP (shown as Media encryption).
Use each SIP device in one app or phone only. Signing in to the same SIP device in two places causes registration and call problems.
-
Download MicroSIP from microsip.org and install it with the standard settings. When Windows asks, allow MicroSIP through the firewall.
-
Open MicroSIP, click the menu arrow at the top right and choose Add Account….
-
Fill in the account:
MicroSIP field What to enter Account Name Any name, for example your name. SIP Server The Domain, including the colon and port. Username The Username. Domain The Domain, including the colon and port. Login The Username. Password The Password. Transport TCP. -
Click Save.
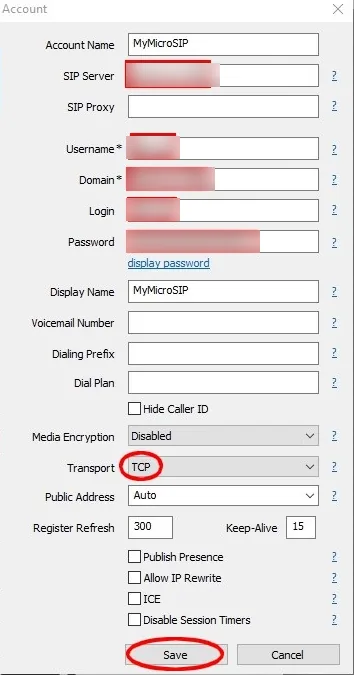
Use TCP, not UDP. With UDP, MicroSIP can drop its registration from time to time.
Check it works
Section titled “Check it works”- In PBX › Devices, the SIP device shows Online.
- Make a test call to check your headset’s microphone and speaker.
If it stays offline, check the details and see Softphone errors. A device that tries to register with a wrong password is blocked, and the block lifts after 5 minutes.