Cisco ATA 191 adapter
Connect an analogue phone, fax machine or paging system to your PBX with a Cisco ATA 191 adapter.
The Cisco ATA 191 is an analogue telephone adapter. It connects analogue phones, fax machines and overhead paging systems to your PBX. It has two phone ports; each port you use needs its own SIP device.
Before you start
Section titled “Before you start”- Add a SIP device to a User under Device configuration, and click Apply configuration.
- Open Devices at the top of the PBX tab and select the device. Keep its SIP credentials open: Domain, Username and Password.
The Domain shows the server address, a colon and the port.
If Transport protocol shows TLS, TLS encryption is on for your PBX. The port in the Domain is then different, and you must set the adapter to use TLS instead of TCP, with SRTP (shown as Media encryption).
1. Connect the adapter
Section titled “1. Connect the adapter”| Port | What to connect |
|---|---|
| PHONE 1 | Your analogue phone or device. Use this port for a single device. |
| PHONE 2 | A second analogue device. |
| INTERNET | A network cable from your router or switch. |
| ETHERNET | Another network device behind the adapter (not recommended). |
| POWER | The power adapter supplied with the ATA. |
The RESET button restores the factory settings.
2. Open the web interface
Section titled “2. Open the web interface”- Find the adapter’s IP address. One way: on a Windows computer on the same network, run
arp -ain Command Prompt and look for the MAC address printed on the sticker under the adapter. - Type the IP address into your web browser.
- Sign in with the default details from the quick start guide that came with the adapter.
3. Enter the SIP details
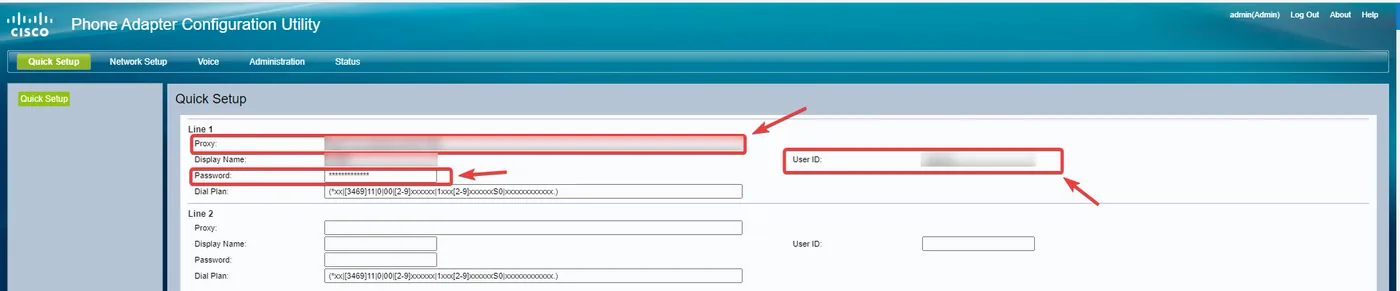
Section titled “3. Enter the SIP details”On Quick Setup, under Line 1, fill in:
| Cisco field | What to enter |
|---|---|
| Proxy | The Domain, including the colon and port. |
| User ID | The Username. |
| Password | The Password. |
| Display Name | Any name you like. |
Click Submit at the bottom.
If it doesn’t come online
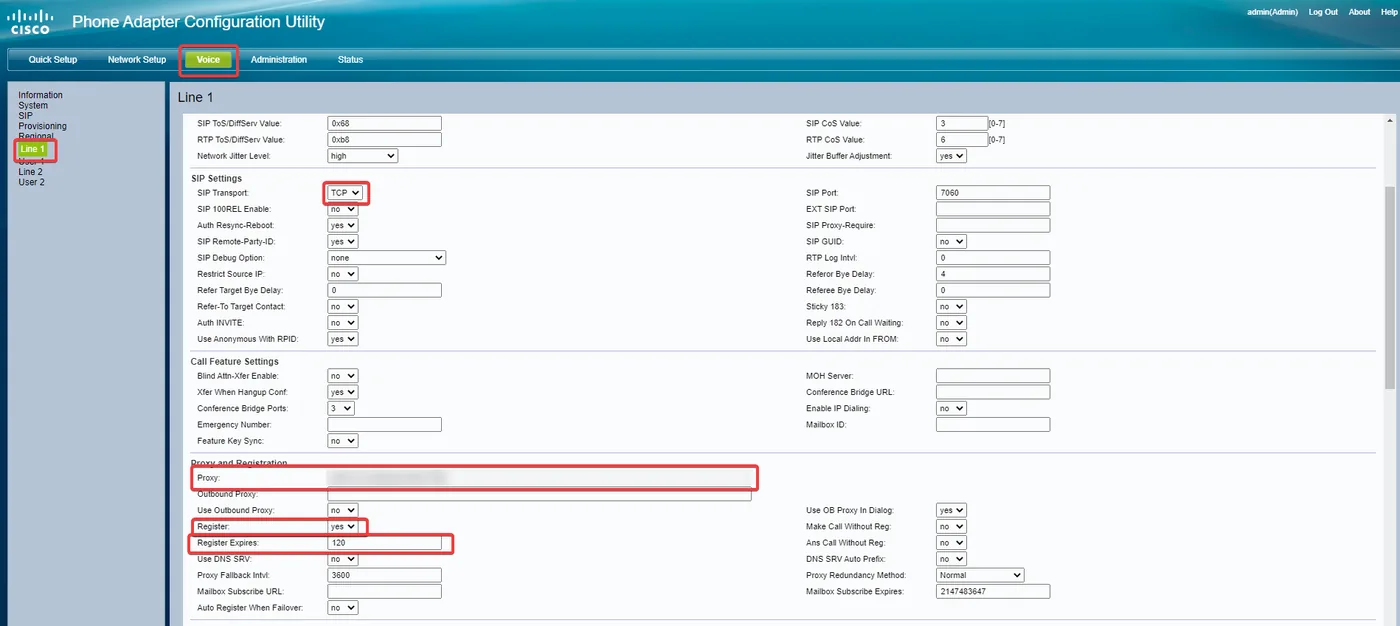
Section titled “If it doesn’t come online”- Open the Voice tab and choose Line 1 on the left.
- Under SIP Settings, set SIP Transport to TCP.
- Under Proxy and Registration, check:
- Proxy matches the Domain, including the port;
- Register is yes;
- Register Expires is 120.
- Submit the changes.
Check it works
Section titled “Check it works”- In PBX › Devices, the SIP device shows Online.
- Pick up the analogue phone, make a test call, and ask someone to call you.
If it doesn’t register, see Softphone errors. A device that tries to register with a wrong password is blocked, and the block lifts after 5 minutes.