User
Set up a person on the PBX with their caller ID, devices, recordings and Webphone access.
A User is a person who makes and receives calls. It holds everything about that person: their caller ID, internal number, the devices that ring for them, call recording, and their Webphone login. Users are also added to other objects such as Queue and Ring group.
Before you start
Section titled “Before you start”Each user needs an unassigned user licence, and each of their devices a device licence. Order them in Services › PBX licences. If no user licence is available, the PBX shows There are not enough user licences when you add a user.
Add it to your call flow
Section titled “Add it to your call flow”- Drag User from the Accept, make and divert calls group onto the canvas and click the gear icon.
- Enter the person’s Name and choose their Licence subaccount.
- Choose a Default caller ID for outgoing calls.
- Under Webphone, enter their Email so they can sign in to the Webphone.
- Under Device configuration, click Add and choose the devices that should ring for this user.
- Click Save, connect an Inbound number or another object to the user, and click Apply configuration.
A user needs at least one device to take part in the call flow. The Webphone password is emailed to the user only after you apply the configuration.
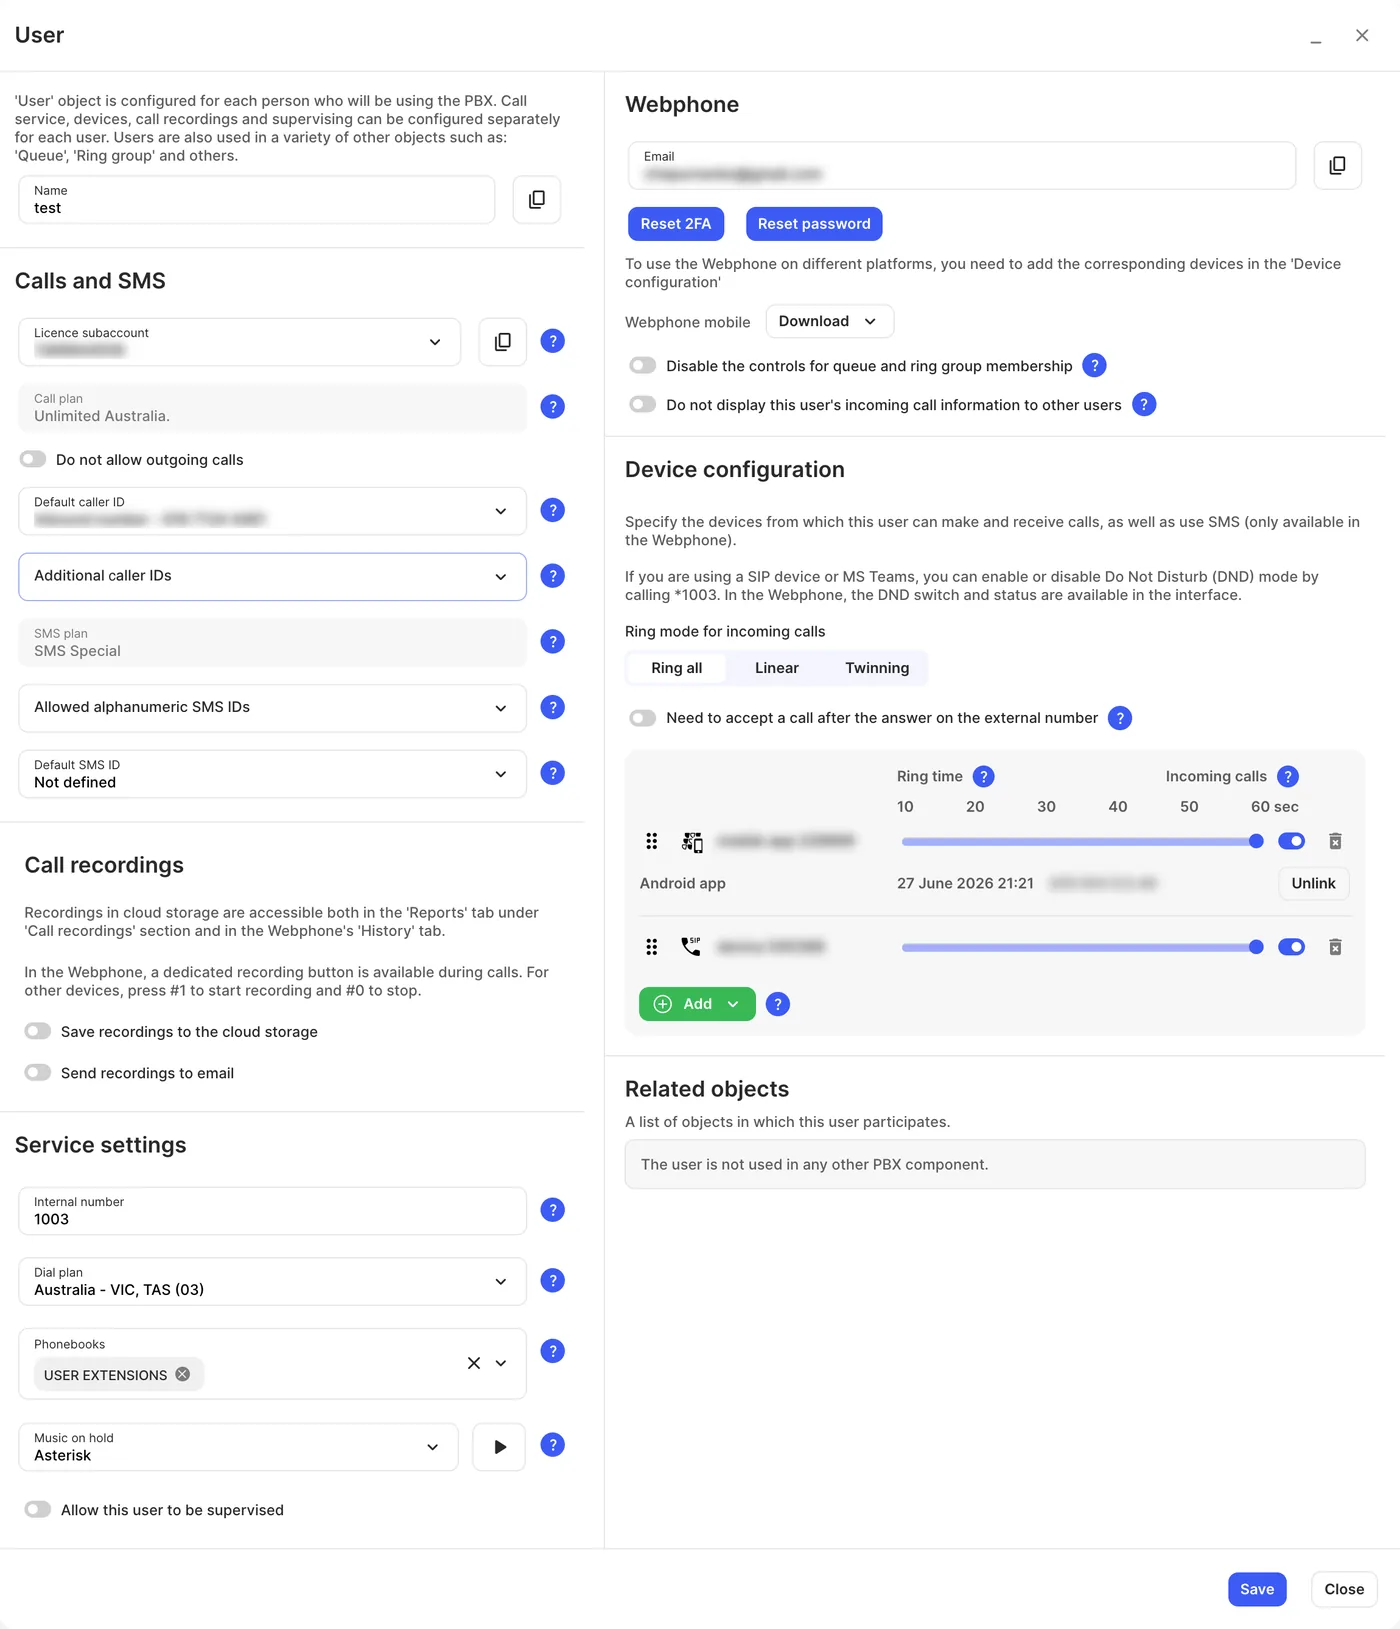
Calls and SMS
Section titled “Calls and SMS”| Setting | What it does |
|---|---|
| Name | The person’s name, shown on the canvas. |
| Licence subaccount | Decides which call plan and SMS plan this user has. To change it, go to Services › PBX licences. |
| Call plan | Shown from the licence. A call plan is needed to make outgoing calls. |
| Do not allow outgoing calls | Lets this user receive calls only. |
| Default caller ID | The number people see when this user calls them. Only your purchased numbers can be used (not toll-free or shared cost). The caller ID name comes from the Inbound number object that contains the number. With no caller ID, calls are anonymous. |
| Additional caller IDs | Other numbers the user can choose for outgoing calls in the Webphone. |
| SMS plan | Shown from the licence. Needed to send SMS. |
| Allowed alphanumeric SMS IDs | Text sender IDs the user can send SMS from in the Webphone. |
| Default SMS ID | The number or sender ID picked automatically for a new SMS chat in the Webphone. |
To send and receive SMS in the Webphone, the user also needs an SMS-enabled number routed to them in Services › Phone numbers › Active numbers (SMS routing).
Call recordings
Section titled “Call recordings”| Setting | What it does |
|---|---|
| Transcribe audio to text | Turns this user’s call recordings into text transcripts. Needs the Speech-to-text service. |
| Save recordings to the cloud storage | Keeps this user’s recordings in cloud storage, shown in Reports › Call recordings and in the Webphone History. Requires call recording storage. |
| Automatically record all incoming calls / Automatically record all outgoing calls | Records every call in that direction without anyone pressing record. |
| Send recordings to email | Emails each recording. |
The two automatic recording options appear only after you turn on Save recordings to the cloud storage or Send recordings to email.
Without automatic recording, users record calls on demand: in the Webphone with the record button, and on other devices by pressing #1 to start and #0 to stop.
Service settings
Section titled “Service settings”| Setting | What it does |
|---|---|
| Internal number | The user’s extension. Other users can call it for free and transfer calls to it. |
| Dial plan | Lets the user dial local numbers without the area code. For example, with the Australia NSW, ACT (02) dial plan, dialling an 8-digit Sydney number adds 612 in front automatically. See Dial plans. |
| Phonebooks | Phonebooks this user sees in the Webphone and on desk phones. For desk phones, we recommend no more than 4; the Webphone has no limit. |
| Music on hold | What callers hear when this user puts them on hold. Collections are set up in Settings › Music on hold. |
| Allow this user to be supervised | Lets supervisors listen to, whisper to, or join this user’s calls. A supervision PIN can be set in General settings. |
Webphone
Section titled “Webphone”| Setting | What it does |
|---|---|
| The user’s Webphone sign-in. Reset 2FA and Reset password help a user who is locked out. | |
| Webphone mobile | Download links for the mobile app. |
| Disable the controls for queue and ring group membership | Stops the user switching themselves out of queues and ring groups in the Webphone. |
| Do not display this user’s incoming call information to other users | Hides who is calling this user from colleagues who have them as a phonebook contact, and stops them answering on the user’s behalf. |
Device configuration
Section titled “Device configuration”Choose the devices that ring when this user gets a call. Click Add to add one:
- Webphone browser, Webphone desktop or Webphone mobile: the Webphone app.
- SIP device: a desk phone or third-party softphone.
- Microsoft Teams: calls in the Teams app. Needs setup in Services › Microsoft Teams first.
- External number: forwards calls to another number, such as a mobile.
| Setting | What it does |
|---|---|
| Ring mode for incoming calls | Ring all: every device rings at once. Linear: devices ring one after another in the order listed (drag to reorder). Twinning: the first device rings first, then the others join it after the delay you set. |
| Need to accept a call after the answer on the external number | The person answering on an external number must press 1 to accept. Stops calls going to a mobile’s personal voicemail. |
| Ring time | How long each device rings. Answering on any device stops the others. |
| Incoming calls | Turn a device off to stop it ringing. It can still make calls and send SMS. |
Related objects lists every queue, ring group, voicemail and other object this user takes part in.
Call paths
Section titled “Call paths”| Path | When it’s used |
|---|---|
| No answer | The user missed or rejected the call, or has Do Not Disturb on. If all of the user’s devices are offline, the call takes this path straight away. Only works for calls that reach the user directly in the call flow, not calls from a Queue or Ring group. Connect it to Voicemail or another user. |
Do Not Disturb
Section titled “Do Not Disturb”On a desk phone or in Microsoft Teams, dial * followed by the user’s internal number (for example *1003) to turn Do Not Disturb on or off. In the Webphone, use the DND switch.
DND is set for the whole user, not one device: turning it on from any device stops calls to all of the user’s devices. While it’s on, the User object on the canvas shows a DND enabled icon. On a Yealink phone you can put the code on a BLF key to switch DND and see its status: see DSS keys, BLF and speed dial.
Hide your number on one call
Section titled “Hide your number on one call”To hide your caller ID for a single call, dial 1831 before the number.
To hide it on every call, set Default caller ID to Anonymous. If a SIP device has its own caller ID, clear that too in Devices.