Set up Microsoft Teams direct routing
Connect your Microsoft 365 tenant to the PBX so Teams users can make and receive phone calls.
This guide connects your Microsoft 365 tenant to the PBX, so your Teams users get a dial pad and can make and receive phone calls. Allow about an hour, plus waiting time for Microsoft to activate the domain.
You’ll switch between three places: the Microsoft 365 admin centre, the portal (Services › Microsoft Teams, Direct routing tab) and Windows PowerShell. Keep them open in separate windows.
Before you start
Section titled “Before you start”- Sign in to Microsoft 365 as a global administrator.
- Read Microsoft Teams direct routing to choose how Teams will connect in the PBX.
- Have the phone numbers you’ll give your Teams users. Each Teams account needs one. Order them in Services › Phone numbers if needed.
1. Give your Teams users the right licence
Section titled “1. Give your Teams users the right licence”Each Teams user who will make phone calls needs a licence that includes Microsoft Teams, plus the Teams Phone Standard add-on.
- In the Microsoft 365 admin centre, go to Users › Active users and click a user.
- Open the Licenses and apps tab and check that Teams Phone Standard is ticked.
- If the licence isn’t in the list, buy it: select Billing › Purchase services, find Teams Phone Standard and order one for each user. Then come back and assign it.
- Click Save changes.
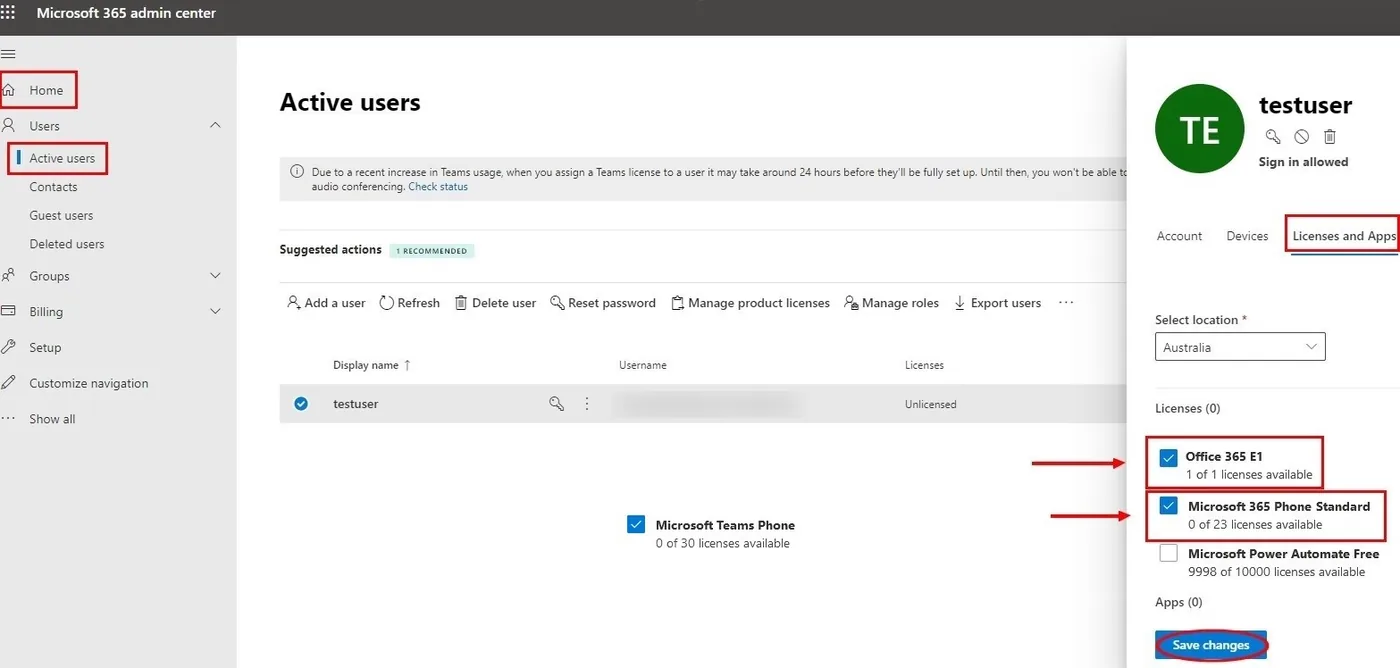
Microsoft renames its licences from time to time. The phone add-on has also been called Microsoft 365 Phone Standard and Microsoft 365 Phone System.
Users on an Office 365 E5 or Microsoft 365 E5 plan usually already have the phone add-on.
2. Add your PBX domain to Microsoft 365
Section titled “2. Add your PBX domain to Microsoft 365”Your PBX has its own domain name (FQDN) for Microsoft Teams. You add it to Microsoft 365 and prove you own it with a TXT record.
-
In the portal, go to Services › Microsoft Teams and open the Direct routing tab. Under Microsoft 365 DNS verification, copy the Microsoft 365 FQDN address with the copy icon.

-
In the Microsoft 365 admin centre, open the domains page and click Add domain. Depending on the admin centre version, it’s under Settings › Domains, or Setup › Get your custom domain set up.
-
Paste the FQDN and click Use this domain.
-
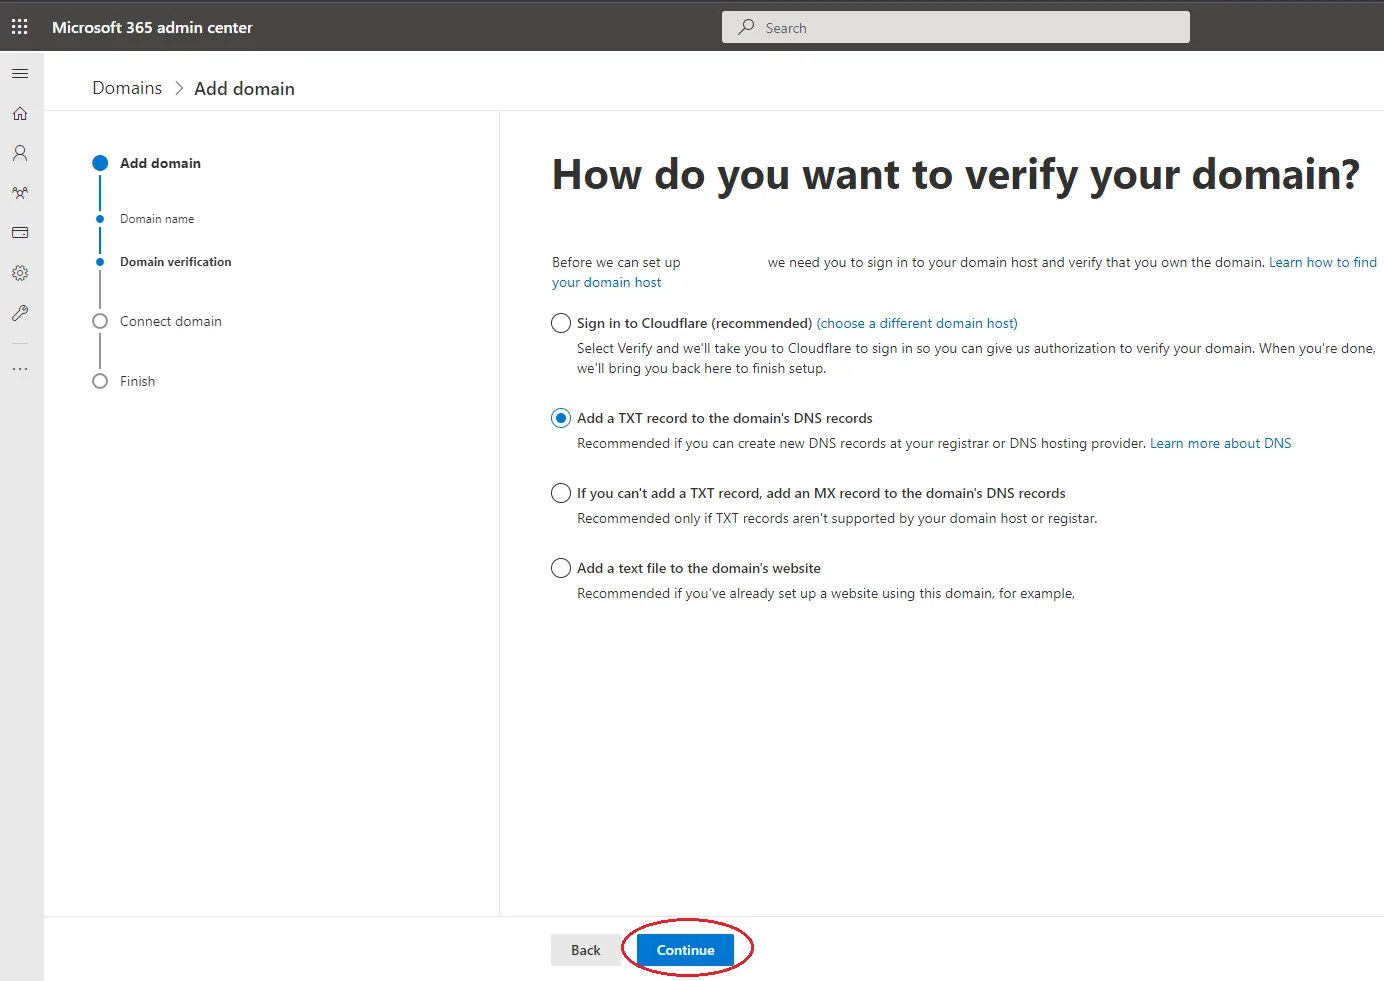
When asked how to verify the domain, choose Add a TXT record to the domain’s DNS records (you may need to click More options first) and click Continue.
-
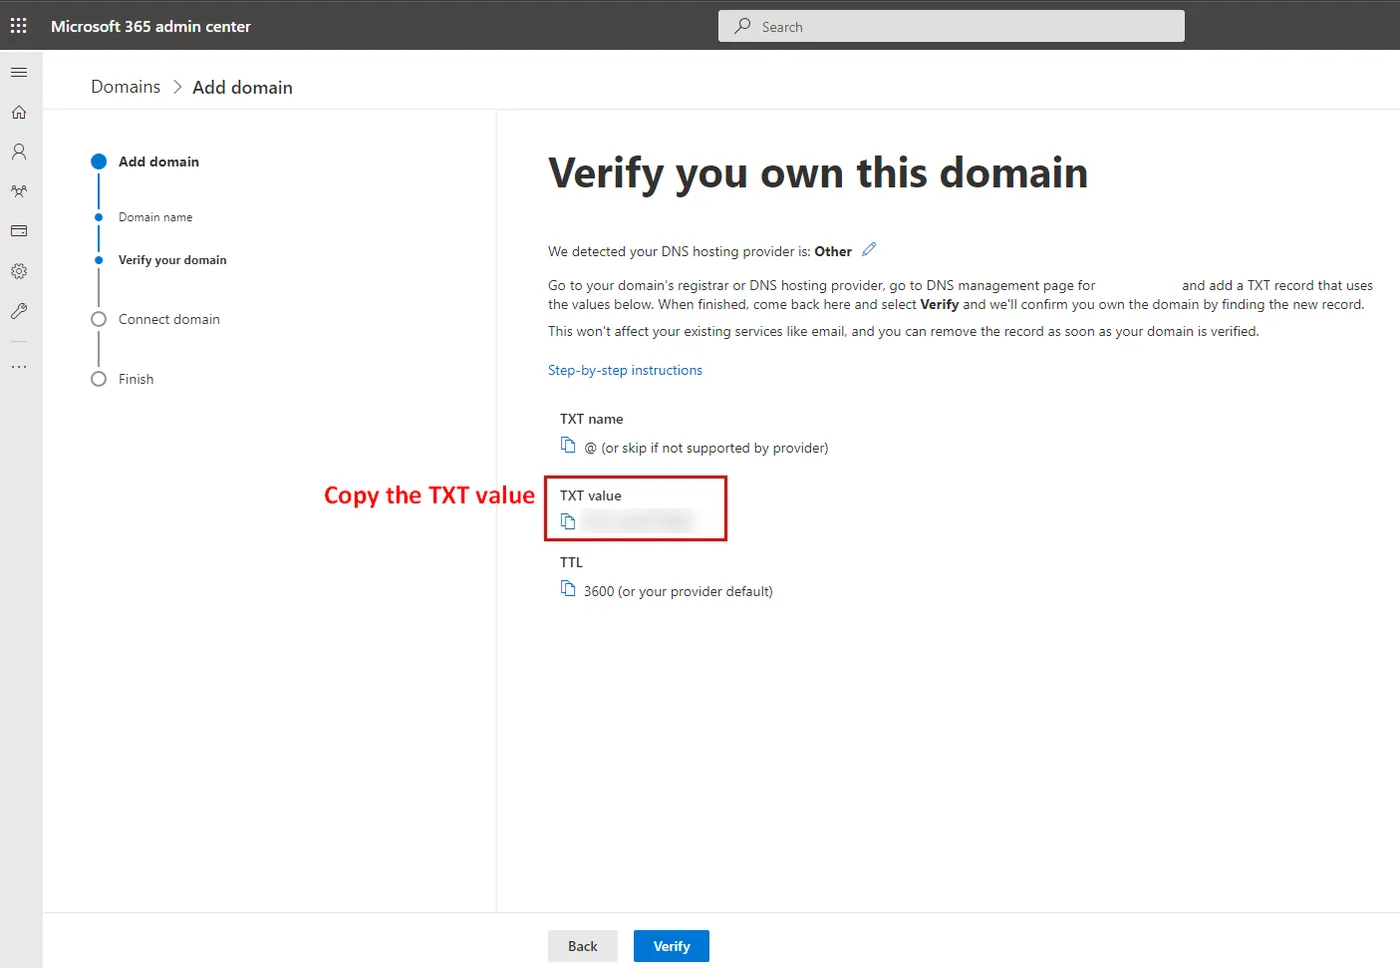
Copy the TXT value. Don’t click Verify yet.
3. Add the TXT record and your Teams accounts in the portal
Section titled “3. Add the TXT record and your Teams accounts in the portal”Microsoft can only verify the domain after the TXT record is saved and at least one Teams account is ordered.
- In the portal, paste the TXT value into Microsoft 365 TXT record and click outside the field. The portal saves it and confirms that the TXT record was updated.
- Under Microsoft Teams accounts, click Add account. The button only works once the TXT record is filled in.
- Enter the user’s Microsoft 365 account (their Teams sign-in email) and choose a Phone number. Repeat for each Teams user.
- Tick Agree to service terms and conditions and click Submit order.

Each number is statically routed: calls to it go straight to that Teams account. If you also use the number in an Inbound number in your call flow, the static routing is turned off and the call flow decides.
4. Verify and connect the domain
Section titled “4. Verify and connect the domain”-
Back in the Microsoft 365 admin centre, click Verify.
-
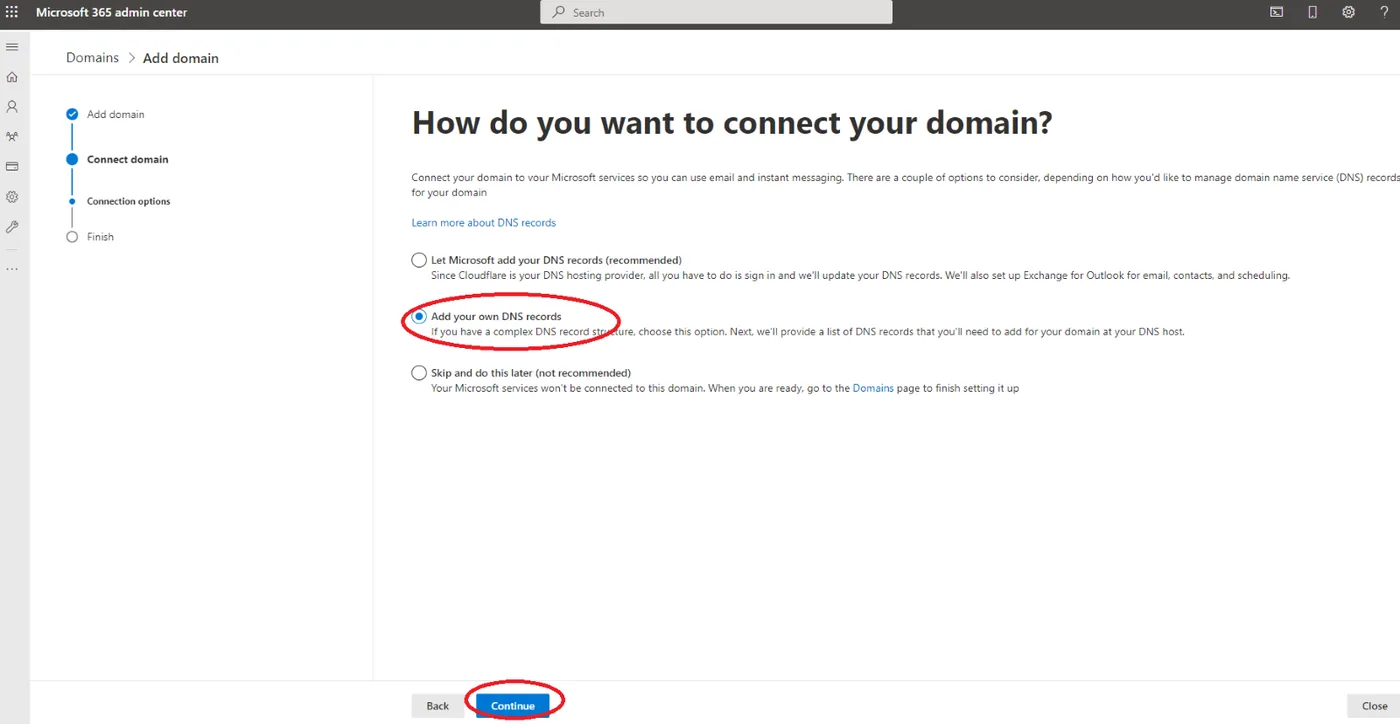
When asked how to connect your domain, choose Add your own DNS records (under More options if needed) and click Continue.
-
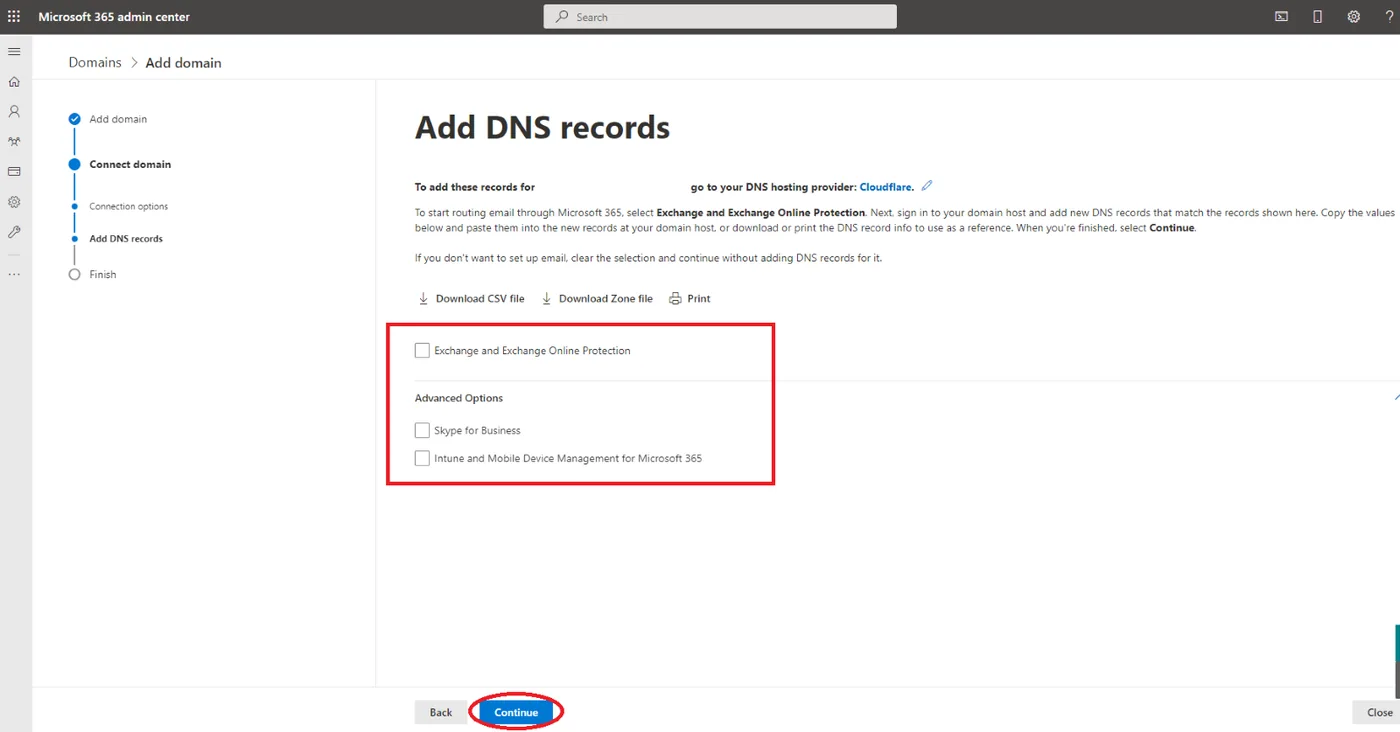
Untick every service, including Exchange and Exchange Online Protection, and click Continue. You don’t need any other DNS records.
-
Click Done to finish.
5. Activate the domain with a licensed user
Section titled “5. Activate the domain with a licensed user”Microsoft only activates a new domain once a licensed user has an address on it. Don’t skip this step: PowerShell can’t create the gateway until the domain is active.
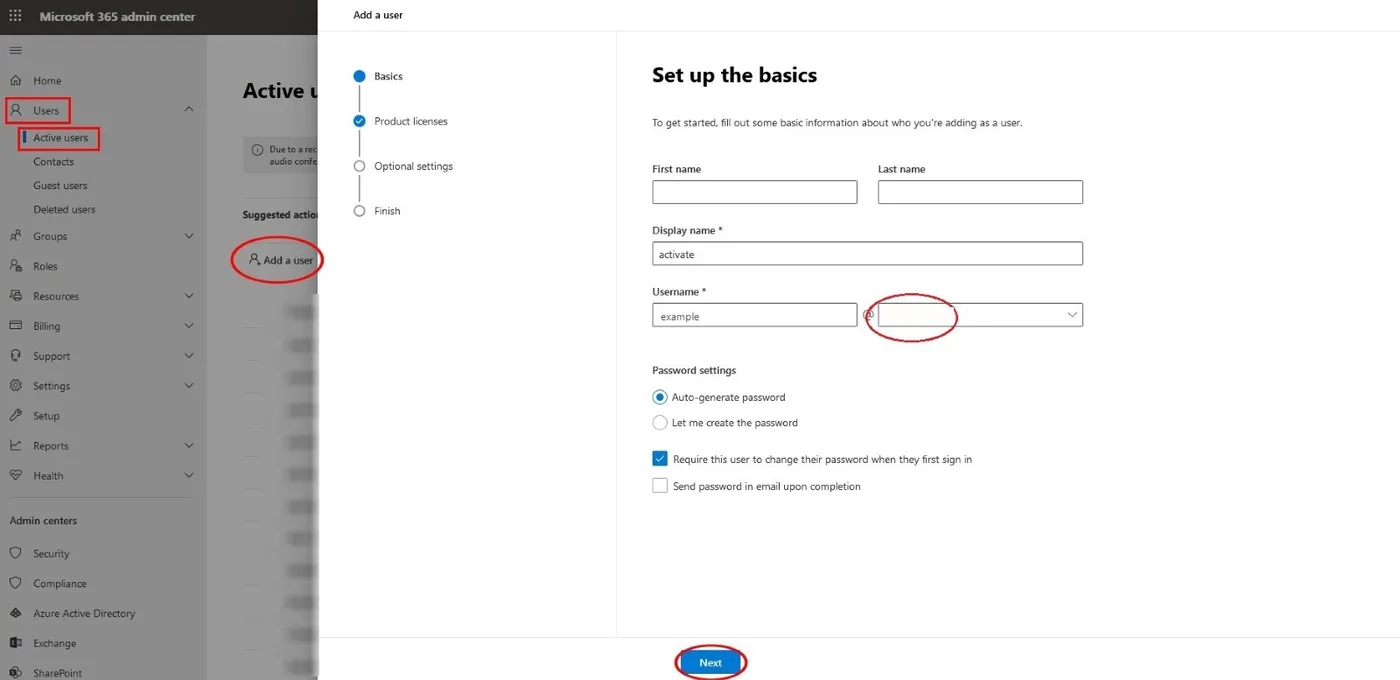
- Go to Users › Active users and click Add a user.
- Enter any name, and for Username choose the PBX domain (the FQDN) from the drop-down.
- Click Next and assign any licence that includes Microsoft Teams, such as Office 365 E1 or Microsoft 365 Business Basic. It doesn’t need the phone add-on.
- Click Next and finish adding the user.
- Adding an alias to an existing user doesn’t activate the domain. It must be a new user.
- If you have no spare licence, move one from another user for now. Once the domain is active, you can delete this user and give the licence back.
- Activation can take a while. If the next step says the domain isn’t configured, wait and try again.
6. Install the Teams PowerShell module
Section titled “6. Install the Teams PowerShell module”-
On a Windows computer, open the Start menu, search for PowerShell, right-click Windows PowerShell and choose Run as administrator. Click Yes if Windows asks for permission.
-
Install the current Teams module:
Terminal window Install-Module -Name MicrosoftTeamsIf it’s already installed, update it to the current version with
Update-Module -Name MicrosoftTeams. -
Allow the module’s scripts to run:
Terminal window Set-ExecutionPolicy -ExecutionPolicy RemoteSigned -
Close PowerShell and open it again as administrator.
-
Sign in to your Microsoft 365 tenant, and enter the global administrator’s details in the window that opens:
Terminal window Connect-MicrosoftTeams
Use PowerShell 5.1 (Windows PowerShell). Teams PowerShell has known issues with PowerShell 7. On a Mac, you can install PowerShell, but Windows is easier.
7. Create the direct routing gateway
Section titled “7. Create the direct routing gateway”The quickest way is the PowerShell commands generator in the portal. It fills in your FQDN for you.
-
In the portal, under PowerShell commands generator, choose Direct routing gateway configuration and click Generate. A text file with your commands downloads. It starts with a disclaimer, followed by the commands.

-
Paste the commands into PowerShell one at a time, pressing Enter after each.
The generated file contains these four commands. To type them yourself, replace <FQDN> with your Microsoft 365 FQDN address.
# 1. Create the gateway to your PBXNew-CsOnlinePSTNGateway -Fqdn "<FQDN>" -SipSignalingPort 5061 -SendSipOptions $false -Enabled $true -ForwardCallHistory $true -ForwardPai $true
# 2. Create a PSTN usageSet-CsOnlinePstnUsage -Identity Global -Usage @{Add="VC PSTNUsage"}
# 3. Create a voice routing policyNew-CsOnlineVoiceRoutingPolicy -Identity "VC VoiceRoutingPolicy" -OnlinePstnUsages "VC PSTNUsage"
# 4. Send all numbers to the gatewayNew-CsOnlineVoiceRoute -Identity "VC VoiceRoute" -NumberPattern ".*" -OnlinePstnGatewayList <FQDN> -Priority 0 -OnlinePstnUsages "VC PSTNUsage"
If the first command says the domain isn’t configured for this tenant, the domain isn’t active yet. Check step 5 and wait.
In the Teams admin centre, the gateway’s status may show as inactive. That’s expected with this setup and doesn’t mean anything is wrong.
8. Enable calling for each Teams user
Section titled “8. Enable calling for each Teams user”- In the portal, under PowerShell commands generator, choose Enable calling on your Microsoft Teams users and click Select accounts. This works once at least one Teams account is set up.
- Tick the Teams accounts you want commands for, and click Generate. A text file with the commands for each account downloads.
- Paste the commands into PowerShell.
To type them yourself, run these two commands for each user. Use the user’s Teams email address, and their phone number exactly as the portal shows it, in international format without spaces (for example 61XXXXXXXXX).
Set-CsPhoneNumberAssignment -Identity "<email address>" -PhoneNumber "<phone number>" -PhoneNumberType DirectRouting
Grant-CsOnlineVoiceRoutingPolicy -Identity "<email address>" -PolicyName "VC VoiceRoutingPolicy"
If you see “lacks appropriate licenses to assign a ‘DirectRouting’ number”, the user doesn’t have the phone licence: go back to step 1. For other errors, see Troubleshoot Microsoft Teams.
9. Let Teams dial numbers without a country code
Section titled “9. Let Teams dial numbers without a country code”Teams adds a + in front of numbers users dial. Without a country code after it, calls can fail. This dial plan passes numbers to the PBX as dialled.
Run these once:
New-CsTenantDialPlan -Identity "Voip dial plan" -Description "Pass all numbers to PBX"
$rule1 = New-CsVoiceNormalizationRule -Parent "Voip dial plan" -Name "Match all digits without plus" -Description "pass everything through" -Pattern '^(.*)$' -Translation '$1' -InMemory
Set-CsTenantDialPlan -Identity "Voip dial plan" -NormalizationRules @{add=$rule1}
Then run this for each Teams user:
Grant-CsTenantDialPlan -Identity "<email address>" -PolicyName "Voip dial plan"10. Connect the Teams accounts in the PBX
Section titled “10. Connect the Teams accounts in the PBX”Add each Teams account to a User (as a Microsoft Teams device) or to a SIP trunk in Microsoft Teams gateway mode, then click Apply configuration. Every Teams account needs a call plan for outgoing calls. See Connect Teams users in the PBX.
Check it works
Section titled “Check it works”- Restart the Teams app. The Calls tab should show a dial pad.
- Call a mobile from Teams. The mobile should show your business number.
- Call the Teams user’s number from a mobile. Teams should ring.
The dial pad usually appears within a few hours, but Microsoft can take up to 48 hours to finish setting up a user.
Next steps
Section titled “Next steps”- Turn off Teams voicemail so unanswered calls follow your PBX call flow.
- Add more Teams users later.
- Troubleshoot Microsoft Teams if something doesn’t work.