Connect FusionPBX with a SIP trunk
Register a FusionPBX gateway to the PBX with a SIP trunk so it can make and receive calls.
This guide connects FusionPBX to your PBX with a SIP trunk. In FusionPBX, the trunk is a gateway that registers to the PBX with a username and password.
Before you start
Section titled “Before you start”- Order a trunk licence and channels: go to Services › SIP trunking, set the number of Channels (one per simultaneous call), click Add licence, tick Agree to service terms and conditions and click Submit order.
- Have admin access to the FusionPBX web interface.
1. Create the SIP trunk in the PBX
Section titled “1. Create the SIP trunk in the PBX”- Go to the PBX tab. Drag SIP trunk from the Accept, make and divert calls group onto the canvas and click the gear icon.
- Enter a Name and set the Number of channels.
- For Mode, choose SIP registration.
- Choose a SIP trunk call plan. Without one, outgoing calls won’t work.
- Choose the Caller ID for outgoing calls, or Keep originator’s caller ID to use the number FusionPBX sends.
- Click Save.
- Connect an Inbound number with the numbers that should ring on FusionPBX to the SIP trunk.
- Click Apply configuration.
Open the trunk’s settings again and note the SIP credentials: Domain, Username and Password. The Domain is shown as server and port, separated by a colon. Also note the Transport protocol: TCP, or TLS if TLS encryption is turned on in Settings › General. See SIP trunk for every setting.
2. Add a gateway in FusionPBX
Section titled “2. Add a gateway in FusionPBX”-
In the FusionPBX web interface, go to Accounts › Gateways and click Add.

-
Fill in these fields from the PBX trunk’s SIP credentials:
FusionPBX field Enter Gateway Any name for the gateway. Username The Username. Password The Password. From User The Username. From Domain The Domain, including the port. Proxy The Domain, including the port. Don’t leave the port out. Register True 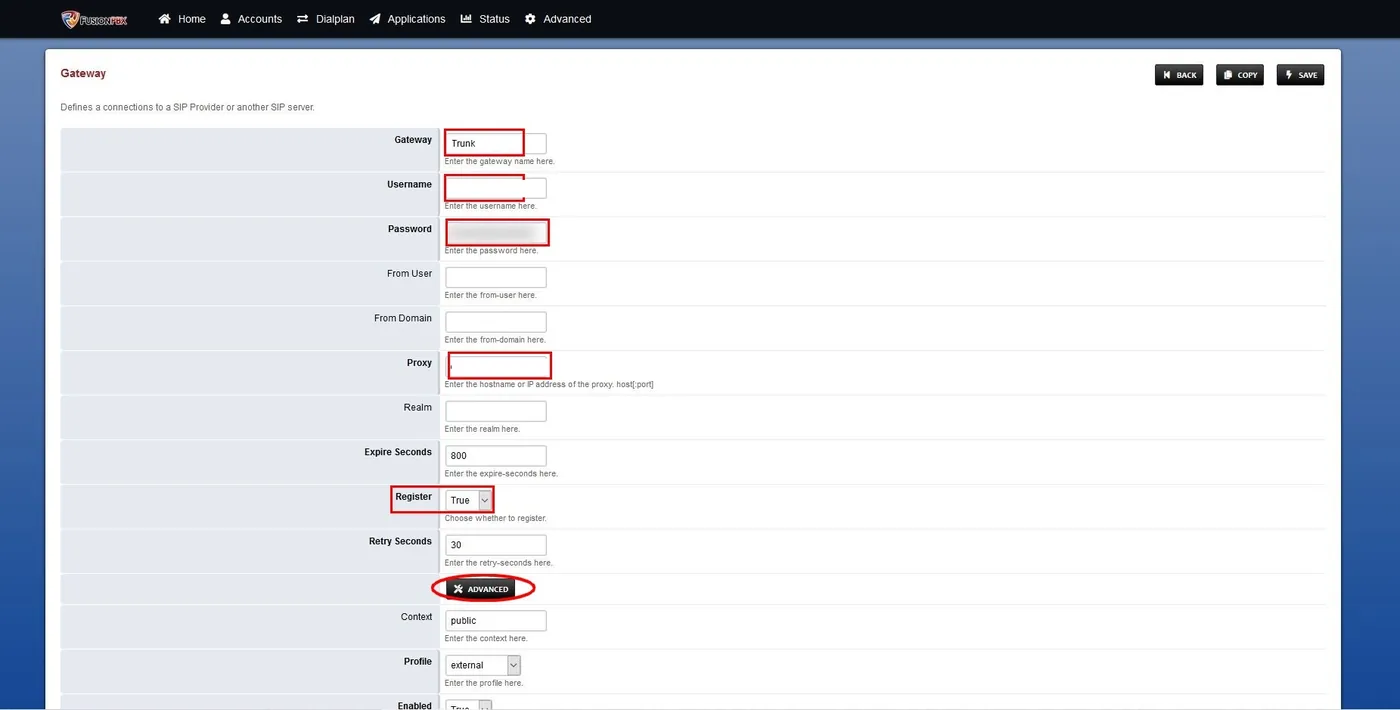
-
Click Advanced to show more fields, and fill in:
FusionPBX field Enter Auth Username The Username. Register Transport tcp, or tls if the trunk’s Transport protocol is TLS. Register Proxy The Domain, including the port. 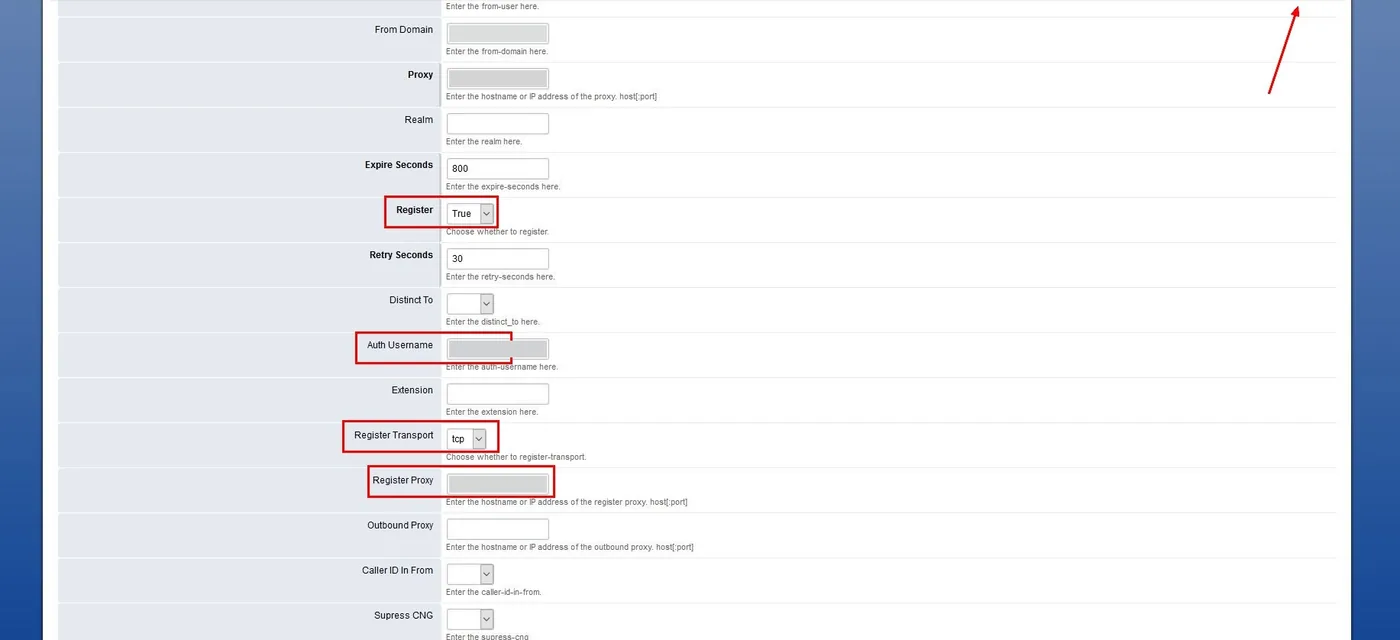
-
Click Save in the top-right corner.
-
Reload the configuration so FusionPBX loads the new gateway.
3. Set up routes in FusionPBX
Section titled “3. Set up routes in FusionPBX”- Add inbound routes for the phone numbers you send to the trunk.
- Add outbound routes that use the new gateway.
Check it works
Section titled “Check it works”- In the PBX, the SIP trunk’s Status shows Online.
- Call one of your numbers from a mobile. A FusionPBX extension should ring.
- Call a mobile from a FusionPBX extension. The mobile should show your caller ID.
If calls fail, check the inbound and outbound routes in FusionPBX. If the trunk stays offline, check the username, password and port: after failed sign-in attempts, the PBX blocks the IP address for 5 minutes. You can check this with Check IP address for blocking in the trunk’s settings.
Next steps
Section titled “Next steps”- SIP trunk: inbound and outbound rules for numbers and extensions hosted on FusionPBX.
- Device offline if the trunk won’t register.